ESP//ENG
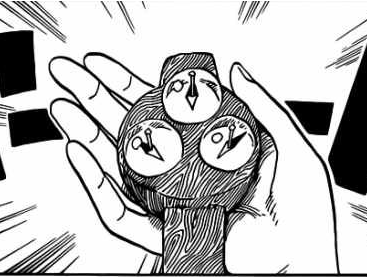
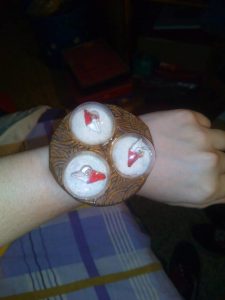
Explicación rápida y sencilla con todos los pasos de como hice el Log Pose del Nuevo Mundo de Nami. Este Log Pose es diferente del que lleva en la mitad de la GrandLine y la diferencia esta en que es igual de grande (tamaño) pero tiene tres pequeñas agujas que señalan a tres puntos diferentes. En este punto es donde encontré un poco de dificultad porque tenia que buscar algo que fuera lo bastante pequeño para que encajara y entrara dentro y no fuera muy basto.
Primero lo que hice fue recortar circunferencias acorde a mi tamaño de muñeca. Mi muñeca es pequeña por lo que no debían de ser muy grandes.
Las pegue entre si. Una vez pegadas, las encole con cola blanca y agua y fui poniendo papel de periódico. Cuando se seco le peque una capa de papel de cocina. Cuando ya todo estaba seco TODO!!!! Me puse a pintar de marrón. Era un tono orientativo, ja que cuando empece aun no había salido en el anime por lo que lo hice un poco por las imágenes que salían a color de los mangas.
 Imgen de referencia
Como podéis ver no tenia mucha idea del color por lo que intente que se pareciera al otro. El primero que hice lo hice mal, porque lo hice entero entonces a la hora de meter las medias bolas no podía. Así que lo repetí…
MATERIAL:
- Cartón fino.
- Hilo de pesca/hilo silicona.
- Tres bolas de juguete tamaño pequeño.
- Tela blanca.
- Velcro
PASO 1.
Recortar dos circunferencias idénticas planas. Recortar dos mas pero esta vez con los orificios para las medias bolas transparentes. Pegarlas entre si. Las que no tienes agujeros, por un lado, las que si lo tienen por otro, y luego juntas.
PASO 2.
Una vez secas las partes. Encolar y empapelar con papel de periódico. Cuando se seque, pegarle una capa de papel de cocina (recomiendo de cocina porque el higiénico es muy fino y no queda igual).
PASO 3.
Cuando ya esta todo seco, añadir un trozo de tela que simulara la correo. Yo lo hice con doble para que tuviera mejor resistencia. Lo pegamos por la parte de abajo, de manera que quede los orificios libres.
PASO 4.
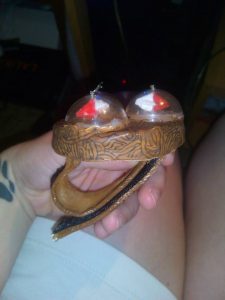
Creamos las flechas/agujas que simulan la brújula. Las hice con cartón fino también, dos rombos, uno cortado por la mitad y pegados. Formando así un rombo 3D. Los empapele de papel periódico y cola. Los pinte y les pase el hilo de pesca/sillicona, con la ayuda de una aguja. Pase el hilo por el agujero de las medias bolas. Y por ultimo enganche las medias bolas a los orificios que hay en la base.
PASO 5.
Pintar!!! Yo use un tipo de pintura especial de dibujo (al menos eso me dijeron) y la verdad que el acabado me encanto. La marca que use era Winton, y un tono como ocre/marrón. Para las formas de las lineas un rotulado permanente negro.
Y finalmente le puse el velcro y lo ajuste a mi muñeca.
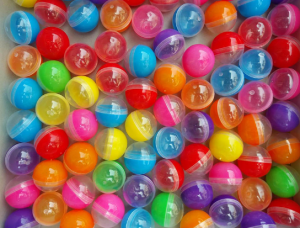
Estas son las bolas que digo. Yo las encontré en las típicas maquinas que metes un euro giras y te sale una bolitas con un juguete. Pues de ahí.
Espero que os haya gustado. ^-^
//
Quick and easy explanation with all the steps of how I did the Nami New World Log Pose. This Log Pose is different from the one in the middle of the GrandLine and the difference is that it is just as big (size) but has three small needles that point to three different points. At this point is where I found a little difficulty because I had to look for something that was small enough to fit and go inside and not very rough.
First what I did was trim circumference according to my wrist size. My doll is small so they should not be very large.
Squeeze them together. Once glued, I glue them with white glue and water and I was putting newsprint. When dry, peel a layer of kitchen paper. When everything was dry TODO !!!! I started to paint in brown. It was a guiding tone, since when I started I had not yet come out in the anime so I did a little for the images that came out color of the sleeves.
CapturaImgen of reference
As you can see I did not have much idea of the color so I tried to make it look like the other. The first one I did I did wrong, because I did it whole then at the time of putting the half balls could not. So I repeated it …
MATERIAL:
Fine cardboard.
Fishing thread / silicone thread.
Three small size toy balls.
White cloth.
Velcro
STEP 1.
Trim two identical flat circumferences. Trim two more but this time with the holes for the half transparent balls. Stick them together. Those that do not have holes, on the one hand, those that have it for another, and then together.
STEP 2.
Once the parts are dry. Glue and paper with newspaper. When dry, stick a layer of kitchen paper (I recommend cooking because the toilet is very thin and does not remain the same).
STEP 3.
When it is all dry, add a piece of cloth that simulates the mail. I did it with double to have better resistance. We glue it to the bottom, so that the holes are free.
STEP 4.
We create the arrows / needles that simulate the compass. I made them with fine cardboard too, two diamonds, one cut in half and glued. Forming a 3D rhombus. Pack them with newspaper and glue. Paint them and pass the fishing thread / sillicona, with the help of a needle. Thread the thread through the hole in the half balls. And finally hook the half balls to the holes in the base.
STEP 5.
Paint!!! I use a special kind of paint drawing (at least that’s what I was told) and the truth is that the finish enchanted me. The mark he used was Winton, and a tone like ocher / brown. For the shapes of the lines a permanent black label.
And finally I put the velcro and fit it to my wrist.

These are the balls I say. I found them in the typical machines that you put a euro tours and you get a little balls with a toy. Well then.
And here the final result.
I hope you liked it.

